My First Chocolate Strawberry
I tried dipping strawberries when I was young. My first batch was a mess. The chocolate was lumpy and too thick.
I learned you must stir constantly. Your arm gets tired, but it works. Now my strawberries are smooth and shiny. I still laugh at that first try.
Making Carrot Strawberries
First, wash your berries and dry them well. Wet strawberries make the chocolate slide off. Trust me on this. Line a pan with parchment paper.
Melt the orange candy melts on low heat. Stir, stir, stir. It takes patience. Doesn’t that smell amazing? Dip each berry and let it harden. This matters because a smooth dip makes them look like real carrots.
The Secret Drizzle
We need a little green for the carrot tops. Use the leftover melts. Melt them just like before. Pour the chocolate into a baggie.
Snip a tiny corner off the bag. Drizzle lines over your orange berries. It looks like dirt on a carrot. This is the fun part. What design will you make? Wavy lines or little dots?
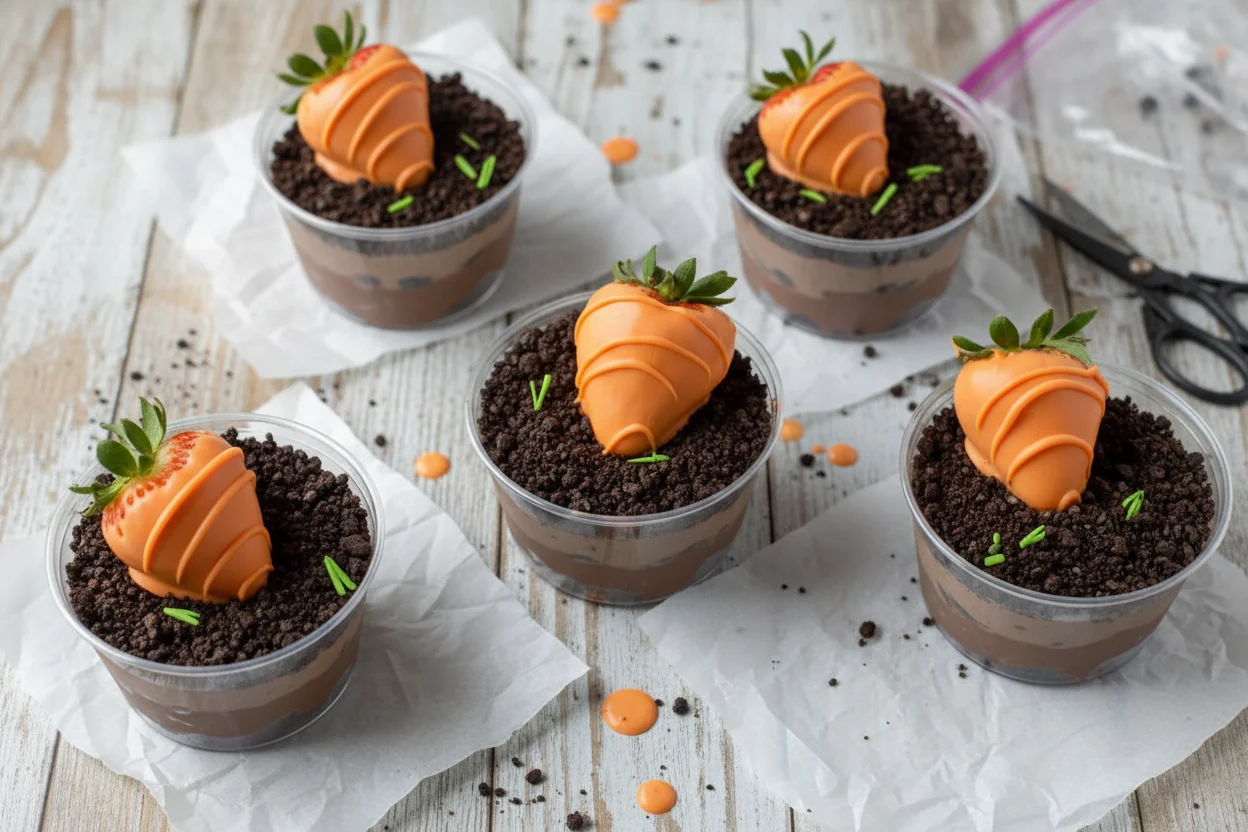
Building Your Pudding Garden
Now for the pudding cups. Crush some Oreos. They are the garden soil. Put a spoonful in a clear cup. It makes a crunchy base.
Make the pudding with milk. Pour it over the crumbs. Top with more “dirt.” Finally, plant your carrot strawberry right in the middle. This matters because eating should be fun. We eat with our eyes first.
Why We Share Food
These are not just treats. They are little stories. You made something from simple parts. You created a tiny garden in a cup.
Sharing them is the best part. Seeing someone smile is the real reward. *Fun fact: Strawberries are the only fruit with seeds on the outside!* Did you know that? What is your favorite food to make for someone else?
Ingredients:
Ingredient Amount Notes
Strawberries Quantity not specified Rinsed and dried, for the carrots
Orange Candy Melts 1 bag For coating the strawberries
Parchment paper As needed For setting the strawberries
Plastic Baggie and Scissors 1 set For decorating
Clear Cups Quantity not specified For serving the pudding cups
Crushed Oreos Quantity not specified For the “dirt” layer
Chocolate Pudding 1 large box For the pudding layer
Milk 3 cups For preparing the pudding
Carrot Chocolate Covered Strawberries As prepared For topping the pudding cups
My Easter Carrot Patch Pudding Cups
Hello, my dear! Come sit. Let’s make a sweet Easter garden. We turn strawberries into little chocolate carrots. It’s magic, I tell you. My grandkids giggle every time we do this. Doesn’t that sound like fun? We’ll plant them in chocolate pudding dirt. It’s our spring tradition.
First, we make our carrot strawberries. You must dry them very well. A wet berry makes the chocolate sad and clumpy. I still laugh at that time I was too eager. What a mess! Pat them gently with a towel.
Step 1: Melt your orange candy melts in a pan on low heat. Stir, stir, stir! Your arm might get tired. But keep stirring for a smooth, shiny chocolate. It takes about five minutes. When it’s perfectly smooth, take it off the heat. (My hard-learned tip: Use a hot pad under the pot. It keeps your counter safe from heat marks!)
Step 2: Hold a strawberry by its green leaves. Dip it into the warm orange chocolate. Swirl it to coat the sides. Place it on your parchment paper. Repeat for all your berries. They look like plump little carrots already! Let them sit until the chocolate gets hard.
Step 3: Now for the drizzle! Melt your leftover candy melts. Pour them into a plastic baggie. Snip a tiny corner off the bag. Gently squeeze lines over your strawberries. This makes them look real, with carrot lines. Let the drizzle set. What other vegetable could we make with candy melts? Share below!
Step 4: Let’s make the garden dirt. Crush some Oreo cookies. Put two spoonfuls in the bottom of a clear cup. It’s like rich, dark soil. Making pudding is next. Just follow the box with milk. I love that simple whisking sound.
Step 5: Pour the chocolate pudding over the cookie dirt. Add another sprinkle of crumbs on top. Finally, push one chocolate carrot strawberry right into the center. Refrigerate until it’s time for your Easter feast. The waiting is the hardest part!
Cook Time: 20 minutes
Total Time: 1 hour (includes setting time)
Yield: About 12 pudding cups
Category: Dessert, Holiday
Try These Sweet Twists
Oh, you can play with this recipe! It’s like a craft project you can eat. Here are some of my favorite ideas. They make the kitchen smell amazing.
Bunny Tails: Use white candy melts. Roll dipped strawberries in shredded coconut. So fluffy!
Flower Garden: Use pink or yellow melts. Add little candy flower sprinkles before the chocolate sets.
Dirt Cups: Skip the strawberries. Add gummy worms to the pudding cups. It’s wonderfully messy.
Which one would you try first? Comment below!
Serving Your Sweet Garden
These are perfect for an Easter table. Line them up like a little vegetable patch. You could even set them on a platter of green coconut grass. I love doing that. It makes everyone smile.
For a drink, a cold glass of milk is always right. For the grown-ups, a little cup of coffee with cream pairs nicely. The bitter coffee loves the sweet chocolate. It’s a lovely match.
Which would you choose tonight?
Easter Chocolate Covered Strawberries Recipe
Easter Chocolate Covered Strawberries Recipe
Keeping Your Easter Treats Fresh
These treats are best enjoyed the same day, as the strawberries can get soggy. However, you can make parts ahead of time.
Store the plain chocolate-dipped strawberries in the fridge on a plate in a single layer. They will keep for one day. Do not freeze them, as the texture will change and become mushy.
You can make the pudding cups a night early—it works perfectly. Just add the strawberry right before serving to save time on a busy day.
Batch cooking matters for busy families. It makes holiday mornings calm and sweet so you can focus on fun, not fuss. Have you ever tried storing it this way? Share below!
Simple Fixes for Common Hiccups
First, chocolate can seize up and get lumpy if water gets in. Make sure your strawberries are totally dry. I remember when a single drop of water ruined my whole bowl.
Second, if your chocolate drizzle is too thick, add a tiny bit of coconut oil. This helps it flow nicely from the bag for a smooth, special look.
Third, if the pudding is too runny, let it set fully in the fridge first—this takes about five minutes. A firm pudding holds the strawberry like a throne.
Fixing small problems builds your kitchen confidence and makes your food taste and look better. Which of these problems have you run into before?
Your Quick Questions, Answered
Q: Can I make this gluten-free?
A: Yes! Use gluten-free chocolate and cookies for the crumbs.
Q: Can I make parts ahead?
A: Make the pudding cups the night before and add the strawberry later.
Q: What can I use instead of candy melts?
A: Try orange-colored white chocolate chips. They work just as well.
Q: Can I double the recipe?
A: Absolutely. Just work in small batches when dipping.
Q: Any optional tips?
A: A fun fact: adding a pinch of salt to chocolate makes it taste sweeter! Which tip will you try first?
From My Kitchen to Yours
I hope you have fun making these. They always bring smiles to my table. Cooking is about sharing joy and making memories.
I would love to see your creations. Your kitchen stories make my day. Have you tried this recipe? Tag us on Pinterest! You can find me at @TessasKitchen.
Thank you for cooking with me today. I am so glad you are here. Happy cooking!
